Graphic organisers present information through visual mappings such as charts, tables, diagrams, and graphs. Graphic organisers highlight connections which guide students' thinking when making, contributing to, or analysing products within Media Arts (Elmore & Coleman, 2019).
Graphic organisers
- harness strong visual representations
- highlight the use of subject-specific terminology,
- allow students in Media Arts to visualise connections between technical and symbolic elements, story principles, techniques, and processes (Bruce, 2008).
Graphic organisers can be used when developing students'
- written analysis of meaning-making,
- collaboration towards the construction of their own products,
- written evaluation of both personal and professional Media artworks.
Examples of Graphic organisers for Media Arts which are unpacked below include:
Interface Tables
The following activity implements an Interface Table focusing on the interaction between technical and symbolic elements, and story principles in
the parlour scene from Hitchcock's
Psycho (VCAMAR038,
VCAMAR039,
VCAMAR045,
VCAMAR046).
This activity can be adapted to support student learning across the
five key Media Arts areas with emphasis on the use of Media languages to tell stories.
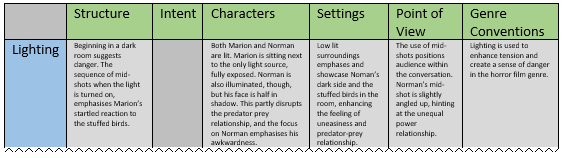
- Teacher provides the student with the interface table worksheet, which lists the technical and symbolic elements against the story principles. This will be used to assist students to analyse an identified key scene. The key scene can be identified either by the teacher or the students.
- Working in pairs or small groups, students are given a specific technical or symbolic element and asked to write notes about its use in the scene (this might be achieved through more than one viewing).
For example, students focussing on lighting might note down:
- Dark scene to start – entering darkroom suggests things are hidden, it is dangerous
- Sole source of light in the room
- Turning light on exposes both Norman and Marion
- Marion sitting in the full glow of the only light source - she is exposed
- Norman is also illuminated, but half in shadow – he is being focused on but in an awkward way
- Lots of other shadows in the room, mostly behind Norman
- As a class, students collate notes into the table. The table interface allows students to recognise and re-order where their observations of technical or symbolic elements are most relevant to story principles. With teacher support, students are encouraged to refine their Media Arts terminology as they add their notes to the table.
Student Sample:
Note: steps 2 and 3 are a form of collaborative learning (HITS Strategy 5).
- The completed table
can be kept as a classroom artefact. Students can draw key information from the completed table to help them in answering structured questions or prompts.
The following questions or prompts are examples designed to encourage the use of a completed Interface Table: Describe the use of a technical or symbolic element that assists in the structuring of the story. Explain how two technical codes are used in conjunction with each other to establish the setting. Analyse how the composition is used to develop the audience's understanding of the characters.
To answer a question or prompt, students highlight the relevant information recorded in the Interface Table. They then use the information to construct sentences or paragraphs to create their response. See 'Writing interpretation responses'.
A model response can also be jointly deconstructed with students before setting an individual task. During the joint deconstruction, the teacher highlights ways in which interpretation responses are constructed. This can include focussing on language choice as well as sentence construction. For example, the teacher may show how:
- phrases of time and place are used to sequence and locate events (e.g. in the opening scene, in the halls and trophy cabinets)
- evaluative language choices reflect mood (e.g. eerie and abandoned)
- expanded noun groups add detail (shots of a darkened school, this aesthetic choice)
- verbs relate technical and symbolic elements to intended effects (e.g. close-ups
focus viewer's attention, the music
evokes a sense of tension).
Narrative Arc
A narrative arc describes a story's full progression and depicts the rising dramatic tension throughout a story. Narrative arcs, like the one below, can be used as an alternative graphic organiser for students to use to analyse a film.
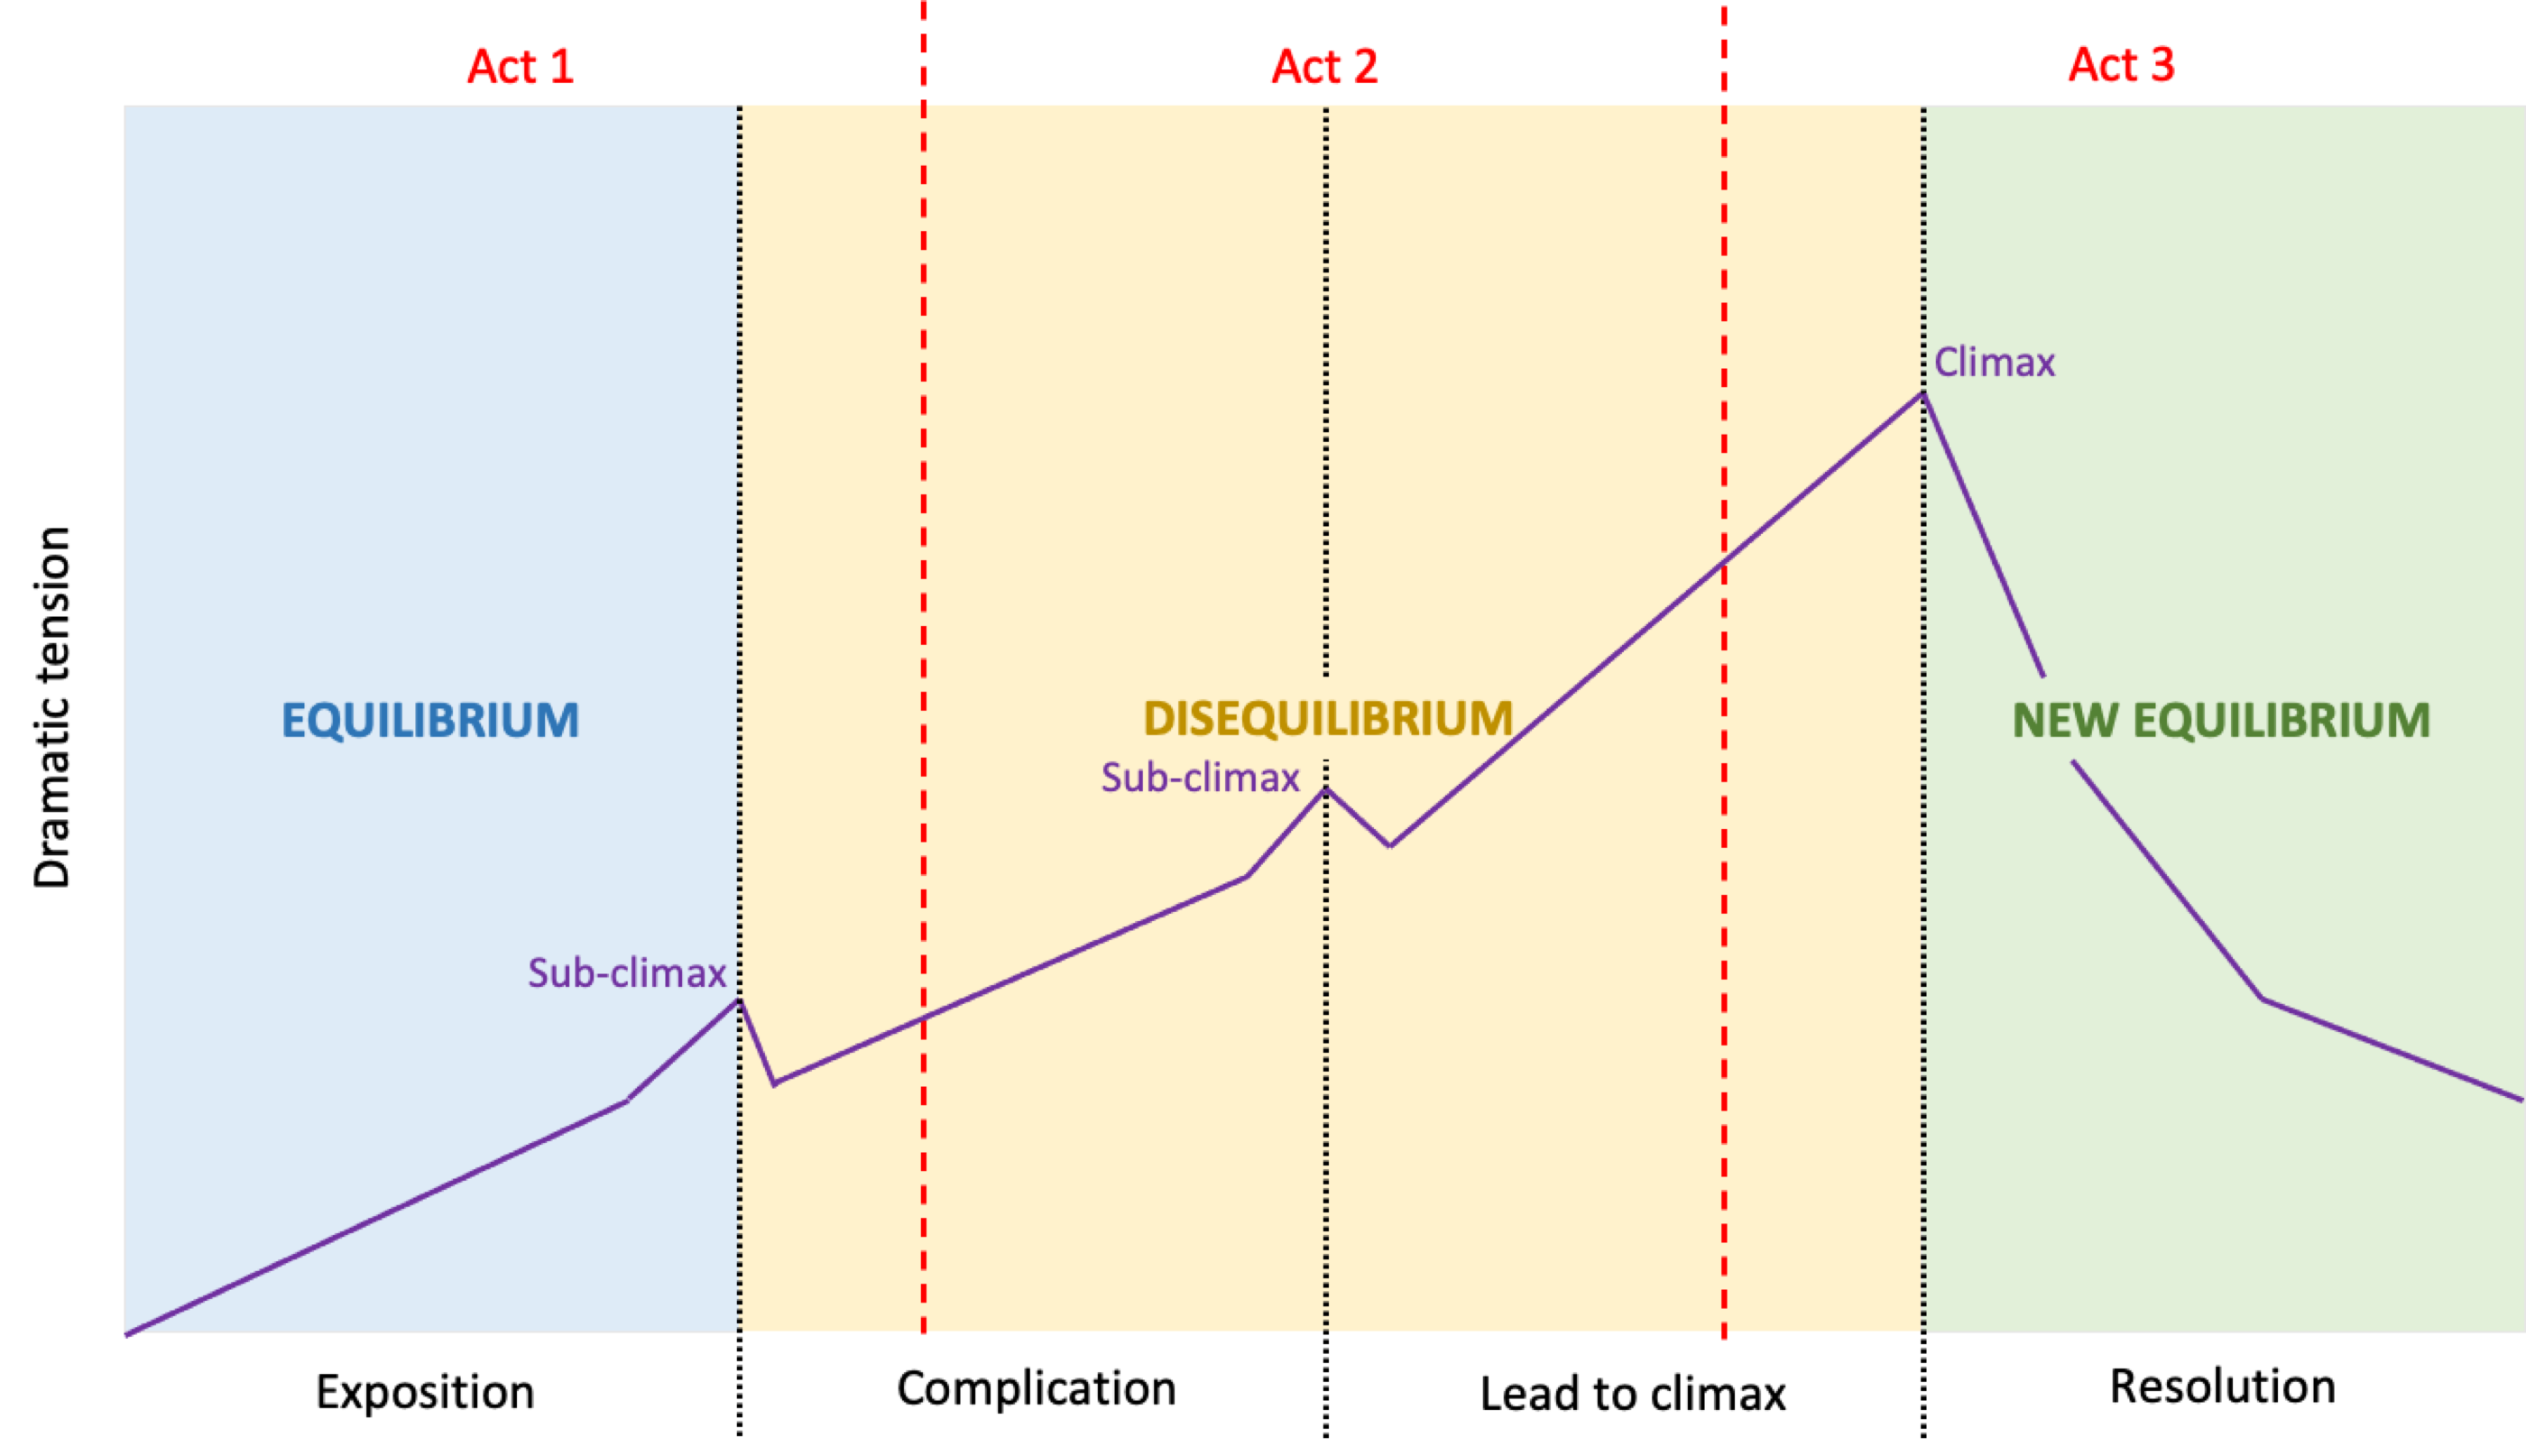
To use a narrative arc graph to analyse media artworks:
- The teacher provides students with a narrative arc template.
- In pairs, students are assigned one technical and symbolic element to focus on when viewing a film or scene.
- As students watch the film or scene, they analyse how their given technical or symbolic element is used and to what effect.
- Students note down their ideas in the relevant section of the narrative arc graph.
- As a modified jig-saw activity, student pairs form groups to share their ideas and analyses of the different technical and symbolic elements.
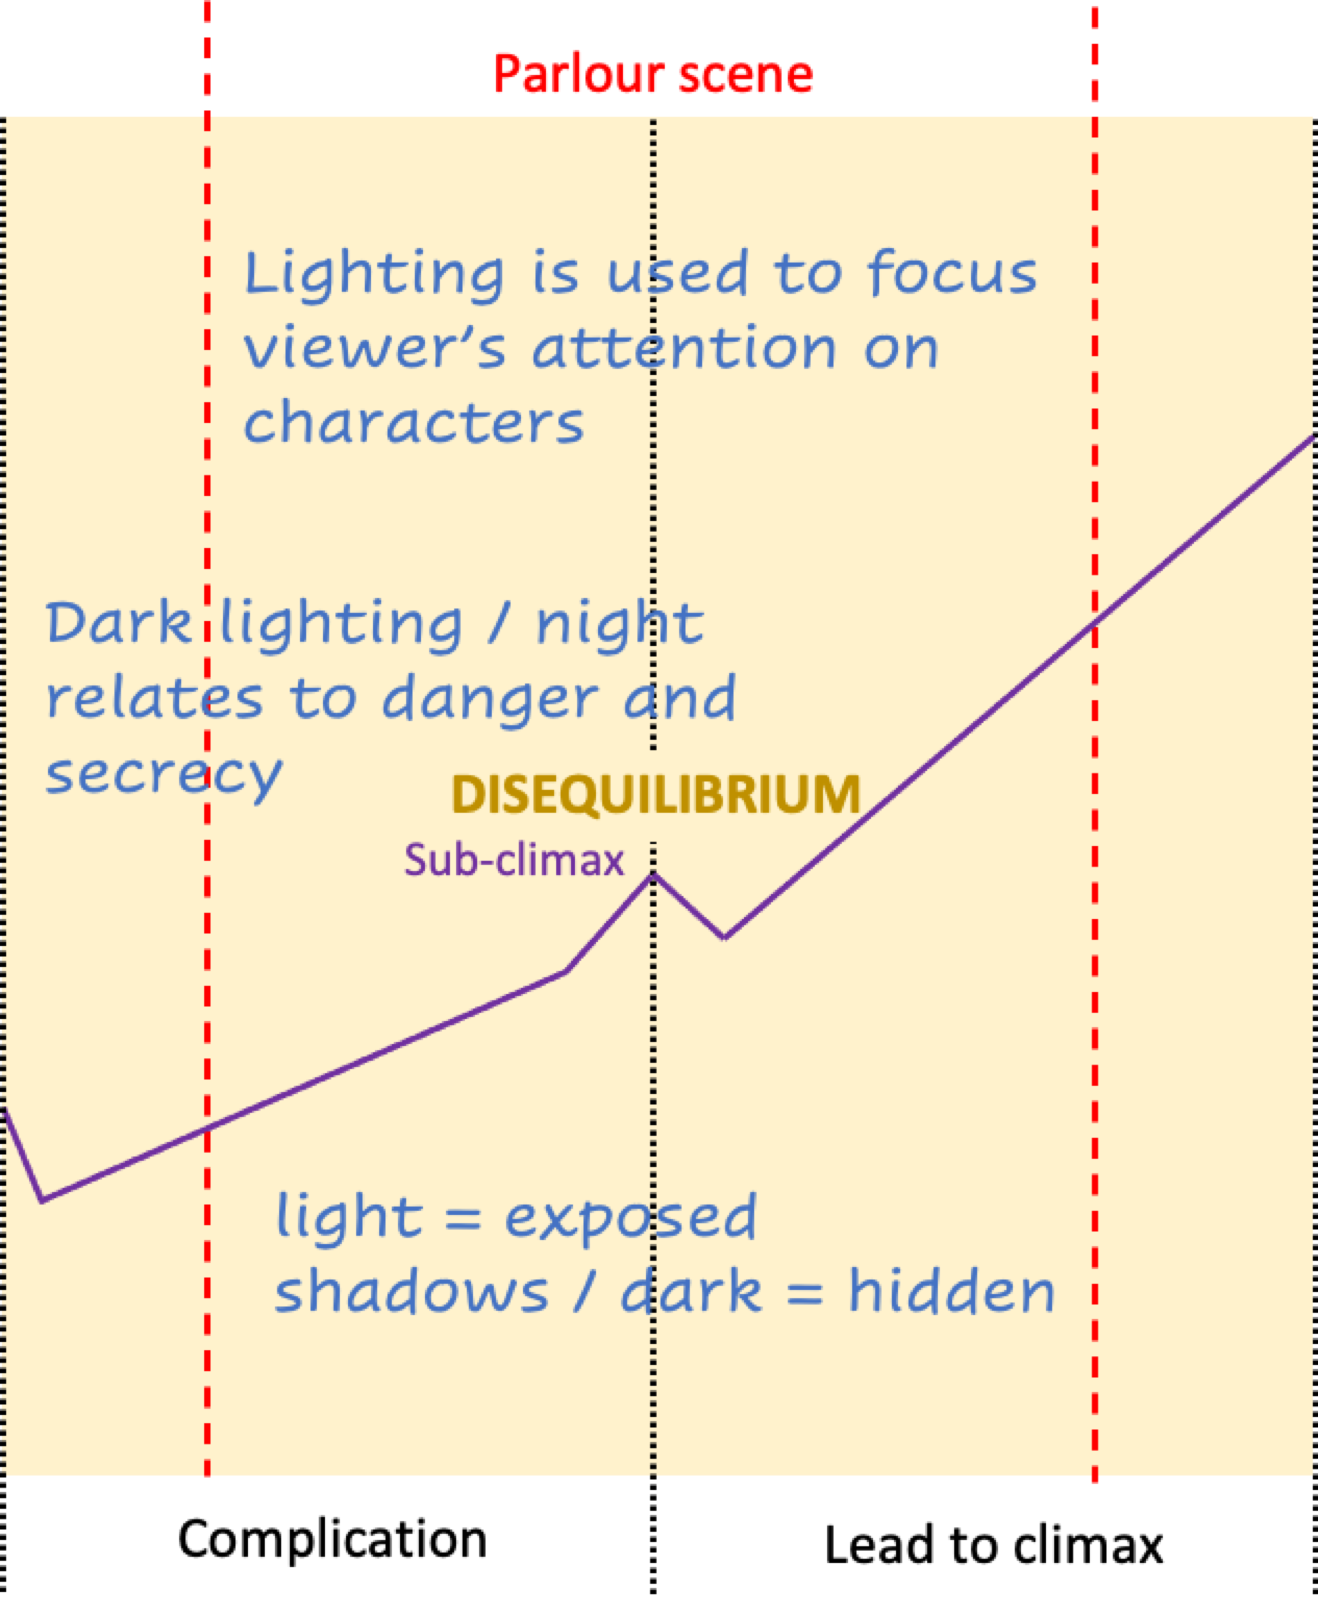
Below is an example of a section of an annotated narrative arc for
the parlour scene in Hitchcock's
Psycho (VCAMAR038,
VCAMAR039,
VCAMAR045,
VCAMAR046).