This focus idea is explored through:
Contrasting student and scientific views
Student everyday experiences
 Many young students will have had memorable but often confusing experiences with magnets and magnetic materials. Magnetic materials are regularly encountered around the home, often holding small objects on the kitchen fridge or keeping cupboards and fridge doors closed. Many children’s toys employ weak magnets to ‘stick’ materials together (e.g. wooden train carriages) or are used in simple children’s construction toys to allow them to quickly assemble more complex structures without the need for messy adhesives or difficult connections. Toys very rarely make use of magnetic repulsion.
Many younger students are yet to form strong views or in many cases any views at all about how magnets interact with matter or each other. They do not see the need to discriminate between magnetic forces and electrostatic forces (or gravity). To them, these often appear to be common experiences of the same invisible non contact force, usually only attraction. For example, a balloon ‘rubbed’ with a cloth resulting in its attraction to another object is frequently described incorrectly by young students (and even some adults) as having been ‘magnetised’ in some way.
Students’ confusion around non contact forces is explored in the focus idea
Electrostatics – Level 4.
It is well established that older students hold a range of views about magnetism that vary considerably in their sophistication, ranging from magnetic models with surrounding ‘clouds’ of action to ideas about ‘electric rays’ and ‘fields’. However, many younger students simply associate magnetism with a ‘pulling force’. Understandably their naive model has no predictive or explanatory power and they typically do not perceive the need to do more than identify and label the attractive or the less frequent repelling behaviour as magnetic.
Research: Erikson (1994),
Borges & Gilbert (1998),
Haupt (2006),
Van Hook & Huziak-Clarke (2007),
Ashbrook (2005),
Hickey & Schibeci (1999),
Maloney, O’Kuma, Heieggelke & Van Heuvelen (2001)
Scientific view
We frequently encounter
magnetic fields in our everyday experiences (e.g. the Earth’s magnetic field and magnetic fields produced by electric current). However, the vast majority of the magnetic fields around us are simply too weak to cause any observed effects or remain ‘removed from us’ because they are utilised in more complex machines like electric motors and computer hard drives.
Magnetic attraction and repulsion is one of three fundamental non contact forces in nature. The other two forces are
electrostatic and gravitational (see the focus idea
Forces without contact at level 4,
Electrostatics – Level 4 and
Gravity - Level 6).
The vast majority of magnets we encounter (e.g. fridge magnets, door catches and magnetic toys) are manufactured from materials which are
ferromagnetic. These materials are based on mixtures of iron, nickel or cobalt as these are the only three known ferromagnetic elements. Stronger industrial magnets can be made with these and the addition of more expensive rare earth elements.
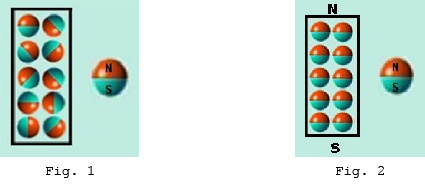
The atoms in ferromagnetic materials are different because they can behave like little magnets. Normally the magnetic field around each atom points in a random direction resulting in them cancelling each other out (see Figure 1). However if the surrounding magnetic field is strong enough, it is possible for them to align so they each contribute to produce a stronger magnetic field in the material (see Figure 2). They can also remain aligned when the surrounding field is removed creating a permanent magnet.
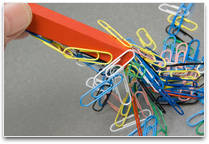
Typical magnets found around the house or used in guitar ‘pick ups’ or fish tank glass cleaners are constructed with ferromagnetic materials and can produce permanent magnetic fields with intensities up to 3000 times that of the Earth’s magnetic field.
Ferromagnetic materials are usually very brittle and will easily chip or fracture if dropped or allowed to slam together. They will also lose their permanent magnetic properties if heated strongly. All of these actions cause the individual atoms to lose their alignment.
The magnetic fields surrounding all magnets are said to have two poles, called North and South. These names originate from the observation that magnets will align in the direction of the Earth’s weak magnetic field if allowed to swing freely i.e. direction finding magnetic compasses rely on this principle to operate. The ‘north pole’ of a magnet takes this name because it always points towards the Earth’s north geographic magnetic pole.
Similar magnetic poles repel and unlike magnetic poles attract each other.
Critical teaching ideas
- Magnetic forces are non contact forces; they pull or push on objects without touching them.
- Magnets are only attracted to a few ‘magnetic’ metals and not all matter.
- Magnets are attracted to and repel other magnets.
At standards up to and including Level 3, it is appropriate to encourage students to observe and explore magnetic phenomena through play. Students should be assisted to develop simple understandings of the observed attraction of magnets to some ‘special’ metals (not all metals) and their attraction and repulsion to other magnets. Students should be encouraged to discriminate between magnetic forces, electrostatic and gravitational forces as being different to each other but examples of forces that can act without physical contact taking place i.e. examples of non contact forces.
 Explore the relationships between ideas about magnetism and non contact forces in the
Concept Development Maps – Electricity and Magnetism.
Explore the relationships between ideas about magnetism and non contact forces in the
Concept Development Maps – Electricity and Magnetism.
Teaching activities
Provide an open problem to be explored via play or through problem solving
Provide students with a variety of different materials for them to investigate which ones have magnetic properties. These materials could include samples of: paper, plastic, polystyrene, wood, glass, rope, leaves, ceramic, rock, and some objects made of iron or steel. Look to use only metallic objects made from iron or steel so students can see that being composed of a solid metallic material is a common property.
Provide students with a bag of samples (say 12-15) and have them test the samples with a bar magnet or fridge magnet to see which ones are attracted to the magnet. Ask them to sort the objects into two separate groups: those that appear to be attracted to a magnet and those which do not.
Invite the students to offer suggestions of common features of the objects in the group that were attracted to the magnet. Is it their colour, weight or the substance they are made of that may make the difference? Have students suggest and test their ideas to identify possible common properties.
 Next, ask students if all objects made of metallic materials are magnetic. Have any students had experiences which suggest otherwise? Now provide students with a number of objects made from different metals and ask them to sort the objects into two piles, predicting which objects will be attracted to a magnet and which will not. Some examples of metals and their sources could be: aluminium cans or foil, brass keys, copper nails or wire, steel screws or nails, zinc flashing or solder, iron bolts or nails, lead fishing sinkers and nickel welding rods.
After sorting the objects students can then test them to see if they have correctly predicted which materials are magnetic.
The intention here is to encourage students to test various materials and through investigation recognise that only a few metals have magnetic properties. An important point to be made is that in our everyday experience most metals appear to be magnetic because the most widely used metal is steel containing iron.
Open up discussion via a shared experience
Most students are familiar with magnets ‘attracting’ magnetic materials or being attracted to some metallic surfaces such as fridges and white boards, but they are far less familiar with magnetic forces that repel each other. This is made more difficult for students to explore because they must have at least two magnets of comparable strength and many of the familiar advertising fridge magnets used for simple investigations are weak and constructed in a way that they have no identifiable magnetic poles.
Try to obtain a number of ‘fish tank’ glass cleaning magnets which are supplied in pairs or ‘cow magnets’ available from some agricultural produce stores. The surfaces of these magnets are well protected and will reduce the risk of students accidentally pinching fingers or the magnets shedding fragments if handled roughly.
Ask the students to investigate what they need to do to make the magnets attract and repel each other. Have them identify different ends of each magnet with identifying stickers. How well can the students predict what will happen when the magnets are brought near to each other?
Now encourage students to use masking tape to fix one magnet onto the roof of a toy car. Use the hand held magnet to push the car along without touching it or to attract the car towards it by changing its orientation. Can students predict if the magnet on the car will be attracted or repelled by the approach of a new magnet?
The intention here is for students to recognise that magnets can repel as well as attract each other. At this level it is not considered important for students to be able to recall that like poles repel and unlike poles attract, but to recognise that magnets can repel and attract without making physical contact and that their orientation is important.
Open discussion via a shared experience
 Students can be encouraged to investigate if magnetic forces pass through other non magnetic materials. To capture student interest, place a magnet (such as a fish tank glass cleaning magnet) on a classroom table. Introduce another magnet (the other glass cleaning magnet) under the table so the two are strongly attracted. Position the magnet so you can move the magnet under the table with your knee or other hand. The magnet on the table top will follow the movement of the magnet below. This mysterious movement of the magnet on the table will impress students but eventually they will discover the ‘trick’ of the second magnet under the table.
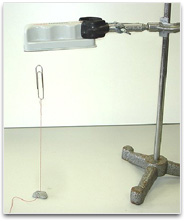
Have the students secure a magnet to a stand or the top of a small water bottle using some ‘blue tack’ or adhesive tape so it overhangs the side face of the bottle. Next have them fix a paper clip to a length of cotton with sufficient length to reach from the table top to the magnet. Finally use some ‘blue tack’ to fix the cotton to the table so the paper clip is just short of reaching the magnet and appears suspended in mid air with a gap between it and the magnet.
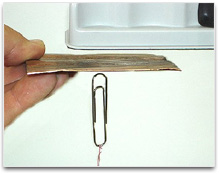 Encourage students to investigate if various materials will stop the magnetic force of attraction when they are introduced between the magnet and the paper clip. Try sheets of paper, glass, tile, aluminium foil, copper and zinc sheet. Do any of these materials have an effect on reducing the magnetic force?
The intention here is for students to observe that magnetic forces will remain unhindered and can travel through most materials without any effect.
Helping students workout some of the ‘scientific’ explanations for themselves
Collect a number of uncoated wire coat hangers and cut and straighten them into short lengths which range from 10cm to 20cm long. Distribute a couple of these around to students working in pairs or triplets, making sure they are given different sized lengths. Also pass around a number (5 to 8) of small paperclips to each group. Deliberately do not pass out any magnets just yet to avoid students bringing them into contact with the wire lengths.
Encourage the students to investigate if any of the lengths of wire are successful in attracting any of the paperclips. If the wire lengths have not made previous contact with any magnets then they should show no magnetic properties and not disturb the paperclips.
Now pass out a permanent magnet to each of the student groups and demonstrate how you can use one end of the magnet to stroke the wire length consistently in one direction causing it to become magnetised. Students can then repeat this with their own lengths of wire and determine if they have been successful in making a magnet by testing its ability to attract or lift up several paperclips.
This method of magnetisation is consistent with the idea of using a magnetic field (from the magnet) to increasingly align the direction of the atoms acting as tiny magnets in the wire. Sharing this explanation with students is not recommended.
Have students describe what they did and discuss how successful they were in making a magnet.
Collecting evidence and data for analysis
After students have successfully made one length of wire into a permanent magnet, set them the challenge of making the most powerful magnet they can. They can again test their success by attracting and lifting as many of the paperclips as they can with their wire magnets. Have students from each group record the number of paperclips their magnet can lift. Encourage students to investigate different properties of the wires that may contribute to making better magnets e.g. compare the number of times each was stroked, the length of the wires and the methods used to stroke each wire.
Encourage students to test their ideas and compare results.